
DIY Sparkling Star Christmas Tree Using Clear Beads
Turn seven star-shaped cookie cutters and clear beads into a beautiful Christmas decoration with a sparkling, crystal-like finish. Finished with a gold ribbon and displayed beside warm fairy lights, this handmade tree adds a festive touch to a mantel, entryway table, or holiday centerpiece.
The charm comes from the combination of simple materials: shiny metal outlines, transparent beads, and stars arranged from smallest to largest. Light catches the beads from different angles, giving the finished decoration a lovely shimmer.
This tutorial uses a glue-based method with transparent backing to hold the beads inside each star. It creates a decoration inspired by the pictured tree without requiring you to melt plastic beads.
Why You’ll Love This Christmas Craft
This DIY star Christmas tree brings texture and sparkle to your holiday décor without needing lots of colorful embellishments. Clear beads work beautifully with gold, silver, white, and natural wood, making the decoration easy to match with your Christmas theme.
You can also personalize the ribbon, change the size of the stars, or use a painted base to coordinate with your room. Once finished, the tree makes a thoughtful handmade gift or a decoration to bring out each Christmas.
Materials Required

Gather everything before starting so you can check the arrangement and allow enough room for drying.
- Seven metal star-shaped cookie cutters in graduated sizes
- Clear pony beads, enough to fill each cutter in a single layer
- Clear, sturdy craft plastic sheets that can be cut with scissors
- Clear-drying craft adhesive labeled as suitable for your metal, beads, and plastic backing
- A wooden dowel or narrow wooden support
- A stable wooden base with a hole sized for the support
- Thin craft wire
- Gold satin ribbon
- Scissors
- A marker
- Small pliers or wire cutters
- A protective covering for your work surface
- Optional battery-operated LED fairy lights for the surrounding display
Before you begin: Test the adhesive on a small sample. Some glues can cloud clear plastic or fail to bond smoothly to metal. Follow the product’s application, ventilation, and curing instructions.
How to Make a DIY Sparkling Star Christmas Tree
1. Plan Your Star Arrangement
Lay the seven cookie cutters flat on your protected work surface. Arrange the smallest star at the top and the largest at the bottom.
Keep one point of each star facing upward. Slightly overlap the outlines to create a continuous Christmas tree shape.
Place the wooden support behind the arrangement to check its height. Leave enough space at the bottom for the support to fit securely into the base.
Take a quick photo of the layout so you can recreate it during assembly.
2. Make the Transparent Backings
Place each cookie cutter on a sheet of clear craft plastic and trace around its outside edge.
Cut out each star carefully. The backing should cover the entire opening and meet the metal rim without extending noticeably beyond it.
Check the fit before applying glue. These transparent pieces provide the surface that holds the beads inside the cutters.
3. Attach the Backings
Apply a thin, continuous line of compatible adhesive along the back rim of one cookie cutter.
Press its matching plastic star into place and lay it flat, backing-side down. Repeat with the remaining cutters.
Allow the adhesive to cure according to the label before adding beads. Keep the stars level so the backing stays aligned.
4. Fill the Stars With Clear Beads
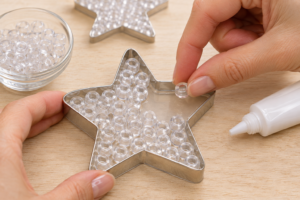
Working with one star at a time, spread a thin layer of adhesive over the inside surface of the transparent backing.
Arrange the clear pony beads in a single layer. Start around the points and edges, then fill the center.
Keep the beads close together without piling them up. A single layer keeps the decoration lighter and helps light pass through the clear surfaces.
Use only as much adhesive as needed to secure the beads. Excess glue may remain visible or reduce the sparkling effect.
Leave every star flat until fully cured.
5. Prepare the Wooden Stand
Fit the wooden support into its base and secure it using a method suitable for the materials.
Check that the support stands upright and that the base is wide and heavy enough for the finished decoration. The larger stars can add weight, so test the stand before attaching them.
If you want to paint the wood, finish that step and allow it to dry completely before assembly.
6. Attach the Stars to the Support
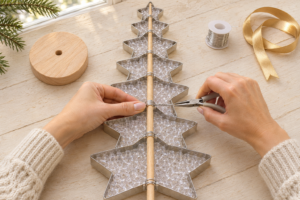
Lay the cured stars face down on a soft protective surface in your planned arrangement. Position the wooden support along the center of their backs.
Use thin craft wire to fasten each metal cutter securely to the support. Loop the wire around the metal frame and the support, keeping it clear of the bead-covered backing.
Where possible, fasten each star at two points to reduce twisting. Twist the ends at the back, trim them, and tuck them inward so no sharp ends remain exposed.
Lift the decoration carefully and check that every star stays in position. Adjust the spacing until the shape looks balanced.
7. Add the Finishing Touches
Tie a gold satin bow near the top, keeping the smallest star visible.
Place the finished decoration on a level surface and check its balance again. Style it beside battery-operated LED lights to bring out the sparkle.
The result is a handmade Christmas tree with shiny star outlines, shimmering beads, and a soft festive finish.
Beautiful Ways to Display Your Star Tree
Create an entryway display. Place the tree on a console table with a small evergreen arrangement and a bowl of decorative ornaments.
Style a Christmas mantel. Pair it with greenery, ribbon, and battery-operated candles. Keep it away from fireplaces and other heat sources.
Make a festive table centerpiece. Set it on a decorative tray with pinecones and a short string of battery-operated lights. Keep the arrangement low enough for guests to see across the table.
Decorate a small space. Use smaller cutters to make a compact version for a shelf or side table.
Tips and Notes
- Keep the beads clear and clean. Remove dust before gluing so the finished stars look bright.
- Test before assembling. Make one small star first to check the adhesive’s clarity and strength.
- Allow full curing time. Glue that feels dry on the surface may still need more time before handling.
- Use a stable base. If the tree leans or wobbles, improve the support before displaying it.
- Keep it away from heat and flames. Use battery-operated lighting around the decoration.
- Treat it as a decoration. Keep loose beads, wire, and the finished piece away from small children and pets.
- Reserve the cutters for crafts. Once used with craft adhesive, keep them separate from your baking equipment.
Easy Decorating Variations
For a snowy look, use white ribbon and a white-painted base. For a warmer finish, leave the wood natural and add a champagne-colored bow.
A few translucent colored beads can create an ornament-like effect among the clear beads. Keep the colors limited if you want the star shapes to remain the main feature.
You can also use fewer stars for a smaller version. Plan the layout first and adjust the support to suit the finished height.
Frequently Asked Questions
Can I make this without melting the beads?
Yes. This tutorial uses transparent backing and compatible adhesive to hold the beads in place. No melting is required.
Do I need exactly seven cookie cutters?
Seven stars create a layered tree like the inspiration picture, but you can use fewer. Graduated sizes help create the tapered shape.
Why does my glue look cloudy?
The adhesive may not dry fully clear on your chosen materials, or it may have been applied too thickly. Test a small sample and allow the full curing time stated on the label.
Can I display the tree outdoors?
Keep this version indoors unless every material and adhesive is specifically rated for outdoor use. Moisture and temperature changes may weaken the assembly.
How should I store it?
Wrap it loosely in tissue paper or a soft cloth and place it in a sturdy box. Avoid putting heavy decorations on top, and check the wire attachments before displaying it again.